Color-copied Object Storage Jar

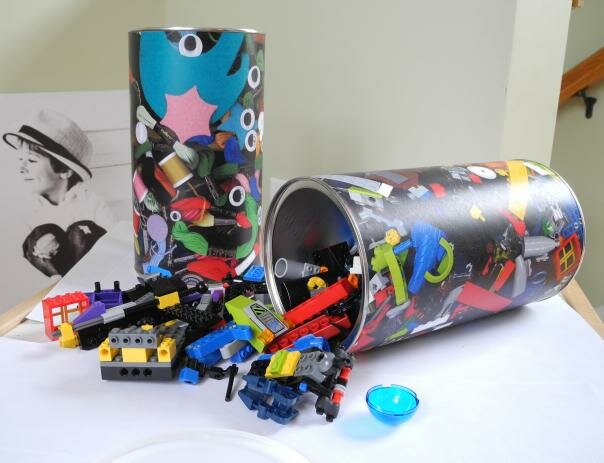
Here is a fun idea for storing small objects, and a great way to re-use coffee cans!
At my house, it seems like LEGO® blocks and other small toys get scattered all over the place. Well, here is a fun way to keep things organized, make it easy for kids to find what they are looking for and to know where to put things away. If your child has several different sets of blocks that you keep separately, this works great for keeping them organized.
Supplies:
- Large coffee cans (or other cylindrical cans like oatmeal containers). The example here is the large size coffee can from my local grocery store, but any can that is less than 10.5” tall, and less than 16.5” in diameter will work for this project.
- A collection of small objects: I chose LEGOs for this project, as they tend to be in abundance at my house. You’ll need about a gallon-size ziptop bag full of objects for each different label you’re making, to get a good effect.
- Cloth to serve as a background (I had some shiny blue cloth which I used for this.) The cloth doesn’t really show up in the final image, it just fills in the extra space.
o Make sure your piece of cloth is about a yard long – you need something big enough to cover the entire glass area of a standard copy machine.
- A color copier – you’ll find one at your local FedEx Office®!

Take your objects and your cloth to your local copy store. (You might get some odd looks from the staff, but the folks at my local FedEx Office—shout out to store #2044 on Ponce in Atlanta!—were wonderfully helpful!) For each set of objects, spread the objects out on the copier glass in an even layer. Carefully drape the cloth over the top to fill in any gaps.
On the copier, choose Color, and select 11”x17” as your size. A single copy typically costs less than $2, but prices might vary. Make your copy!
You’ll now have a large sheet of 11” x 17” ‘wrapping paper’ for your can.
Repeat for any of your other sets of objects, printing enough so that you have one sheet for each can you’re wrapping. You may also want to make a few spares just in case!
Back at home, trim the sheet down to size using a razor knife:

· If your coffee can has a removable label, you can remove the label and use it as a template. Otherwise, just measure the height of the can to determine the height of your wrapping. Trim off the excess on the 17” sides, removing the white border and an additional excess
· Trim off the white border on only one of the 11” sides.
After you have your new ‘wrapping paper’ label cut to the correct height, use tape to attach the side that still has the white border to your coffee can. Then wrap around the can, and use a little bit of glue or paste to stick the wrapper on.
And that’s it! If you’re worried about durability, you can cover the whole thing in decoupage medium, if desired.
Related FedEx Office Solutions: Printing & Copying Services
Nancy Dorsner is a web designer and blogger. Her blog, Dabbled – Experiments in Art, Craft & Food, is all about trying something new and being creative, and specializes in upcycling& recycling craft ideas. FedEx Office is compensating Nancy to share her ideas for creative projects on the Out of Office blog.


Comments
Post new comment