Holiday Stamped Stationery

The holiday season is a perfect time to make use of the FedEx Office® services that will save you time when creating multiple projects such as stationery and gift tags. Part of this project also offers the perfect opportunity to get children involved.
Materials
- Large self-inking stamp customized with the JPG image of the words “Peace + Love”
- Assorted cardstock
- Size A2 envelopes
- Flat ribbon with no texture
- Printout of geometric shapes
- Hole punch
- Corner punch (optional)
Step 1: Rubber Stamp
Place an online order for the stamp using the FedEx Office® Design & Print Center. The stamp will be shipped to your address within seven business days—very convenient – and it comes with very easy-to-follow instructions for its setup. It simply involves attaching the rubber stamp to the ink carrier/holder. Part of the package includes a small white label that is attached to the top of the stamp. Save the frame of that label—it will be key for this project.
Step 2: Envelopes
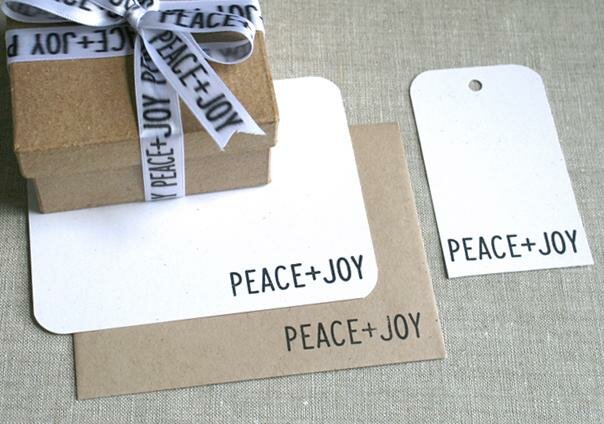
Place the frame of the stamp label on the corner of the envelope and use it as a guide to place the stamp. Place the stamp over the label by matching the embossed corner marks on the label (not visible in the photo). Optional: First practice on a scratch piece of paper that is the same size as the envelope.


Step 3: Stationery
Cut card stock to a standard size of 4.25” x 5.5” and stamp them the same way as the envelope. Optional: Round the corners with a corner punch.
Step 4: Gift Tags, Style 1
Stamp a scratch piece of paper to measure the width of the stamped text and use those measurements to cut out a tag that is 2.5” x 4”. I stamped the bottom of the card, punched a hole at the top for a ribbon and rounded the corners with a corner punch.
Step 5: Stamped Gift Ribbon
By this point, the use of the stamp is a bit more familiar so you can move on to the ribbon. Simply line up the stamp, centered on the width, and press it several times along the length of the ribbon. I noticed that the spacing is best when the stamp is lined up with the letter O of the previous image. Set aside to dry. Note: the ink may spread a bit because the fabric absorbs the ink.
Step 6: Gift Tags, Style 2
Print out the geometric shapes in the PDF and cut out the shapes. Press the Peace + Joy stamp randomly across each of the shapes. Punch a hole at the top of each shape, thread ribbon through it and the gift tags are complete.

Kids would love to help with the stamping here. It’s an easy project to follow since there is no need for the stamping to be perfectly straight.
Step 7: Tie It Up
Wrap gifts with a strip of paper that is 2.5” wide and is stamped with Peace + Joy throughout.
Tip: Use another holiday saying or your family’s last name or initials to give your stationery and gifts more of a personal touch. A personalized stamp would also make a wonderful stocking stuffer!
Patricia Zapata is a blogger, graphic designer, crafter and the author of Home, Paper, Scissors: Decorative Accessories for the Home. She has her own craft blog called A Little Hut. FedEx Office is compensating Patricia to share her ideas for creative projects on the Out of Office blog.
Related FedEx Office Solutions: FedEx Office Design & Print Center


Comments
Post new comment