Monogram Magic
Guest blogger Lynsey Purl is a senior communications specialist at FedEx Office. She is a very creative mom of two, and recently transformed her four-year-old’s room using a FedEx Office product. She shares details with us below.
My daughter is starting what we’ll call “big girl” school next year, and for her birthday she asked for a place to do her homework. She’s showing star student potential already – I’m so proud! Seriously though, she does need a place all her own where she can work without interruption from her younger brother.
Her nursery walls were a rich pastel blue (kind of the color of that little blue jewelry box we all hope to receive, if you know what I mean!) and we repainted them to a soft grey. Here’s the room before the transformation.

To personalize the room, I had this great idea to include her monogram above her bed. The white monogram really pops on the grey walls and it adds a nice touch. Plus, my sweet girl is really into decorating these days, so I knew this would be right up her alley.
I was thrilled to learn that FedEx Office can actually make these monograms. I’d seen them on blogs and catalogs, but had no idea how easy (or inexpensive!) it would be to do it myself. The concept is the same thing you see in store windows – they are peel-off vinyl clings. They aren’t permanent so we can use it in a different spot later if we rearrange, or make an entirely new one with a different image.
Here’s how I did it.
STEP ONE:
My crafty friend designed a simple monogram and sent me the vector file.
I took the file on a jump drive to my local FedEx Office (but you could also email it – look up the address for your nearest center here) and worked with the folks there to see a proof. I’d like to give a special shout-out to Art and Shaq who walked me through the whole process.
There was a one-day turnaround, which worked perfectly for me because I was hosting a party later in the week and wanted to finish the room re-do so everyone could see it!
STEP TWO:
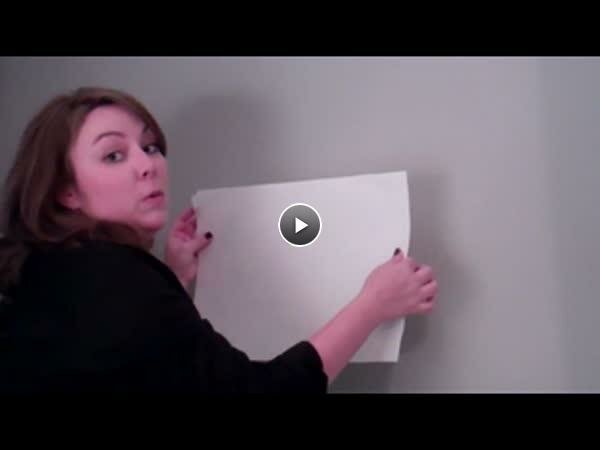
When I went to pick up the monogram cling, it looked great. The white letters are sandwiched between two protective sheets.

You peel the backing off the white letters and smooth them on the walls, then you gently peel off the second backing sheet. It was super easy and – wait for it – less than $20!
Ta-da!

I loved the way it looked (and so did my daughter), but felt like it could use a little more pizzazz. I enlisted the help of another crafty friend who came over and painted this beautiful swirl design around the letters to add that final touch.
Here’s the finished product.

I’m thrilled with how it turned out, but more importantly, my daughter loved it!
Related FedEx Office Solutions: Signs, Banners & Oversize Prints, Decals


-
January 3, 2012
-
September 9, 2010
-
January 6, 2011
-
March 5, 2010
-
February 22, 2011
-
December 1, 2010
-
November 20, 2012
-
June 21, 2010
-
August 2, 2010
-
January 11, 2011

|
About FedEx
|
FedEx YouTube Channel
|
|
FedEx Blog
|


- December 2009 (18)
- January 2010 (15)
- February 2010 (12)
- March 2010 (13)
- April 2010 (10)
- May 2010 (15)
- June 2010 (14)
- July 2010 (11)
- August 2010 (12)
- September 2010 (13)
![]()
Comments
Post new comment